PosMetadef.txt & PosMetaDef_User.txt
These files define how the POS sees and understands the database. These files are defining the meta data
used by the POS engine.
These files are of interest to designers wanting to control data replication or extend tables and fields
Fpos.ctl & fpos_all.ctl & fpos_fieldpine.ctl
These files control how PosGreen works and operates. Typically providing pointers to database, site and
lane specific settings or overrides.
Platform Use Guide
| Function | Windows | Android | Web | Mesh |
| Fpos.ctl Files |
Yes |
No |
No |
No |
| PosMetaDef Files |
Yes |
No |
No |
No |
MESH()
Defines how a table should be processed using Mesh storage.
Syntax: MESH(name,pk-field,pk-id,phykey-id,tubt-txn-id,table-type)
Name
Storage name for data
pk-field
pk-id
physkey-id
tubt-txn-id
The transaction type to use for edits to this table. These codes are reserved to Fieldpine and you must not
allocate your own codes.
The code "190" is available for general purpose use. This code defines a "general database edit", which means that any
edits or table changes are processed as 190 transactions. The transaction implementor for this code understands how process many
different tables. If you are wanting to replicate private tables, use the code 190
table-type
For tubt-txn-id 190, this defines the type of data held in this table. The options are
| Keyword | Description |
| Audit |
Audit/Log style data
- Data is written on clients
- Replicates up towards master nodes, but not over to other siblings
- Data is NOT expected to be changed once created
|
| refro |
Reference-Read-Only data (not supported for general use)
- Data is written on master systems
- Replicates to all nodes
- Clients are only permitted read access
|
| refrw |
Reference-Read-Write (not supported for general use)
- Data is created on master systems
- Replicates to all nodes
- Clients can EDIT rows and these changes propogate to all nodes.
- Clients cannot insert new rows
|
| fullrw |
Full-Read-Write (not supported for general use)
- Data is created everywhere
- Data is replicated everywhere and is expected to logically be everywhere at all times. Specifically, all nodes have all data.
- Logically appears like a normal sql table
- Not designed for high shared update environments.
- Some design restrictions apply
|
| partrw |
Partitioned-Read-Write (not supported for general use)
- Data is created everywhere
- Data is replicated to nodes that have interest in that record, but replication can be deferred until requested. This means a node can request a record and it will be fetched from the network if needed. If the record is held locally however, it will be maintained.
- Logically appears like a normal sql table
- Not designed for high shared update environments.
- Some design restrictions apply
|
Example: MESH(cashdrawerlog,,,114,190,audit)
MESH(products,pid,100,210,402)
Licensing operation varies by platform and version. In general the primary purpose of licensing is
to ensure that gross misconfiguration does not occur more than usage restrictions.
PosGreen (fpos.dll) - Non Mesh - Technical Description
When the system starts, it reads fpos.ctl and looks for a licence command. Any licence entries
found are verified against the current platform (this is typically done using the Windows Product Key as a base
reference). If no valid licence is found:
- Generates a numeric only "System Code". For example 2 5637 1729 1819
- This system code is sent to Fieldpine, who will issue a licence key, tied to that System Code.
Corporate customers can be given their own restricted onsite licensing utility if required
- The licence code issued is completely alphabetic, e.g. VBHE GTHE JIKL ZZZAB GHRY and is
entered into fpos.ctl
- The licence code also contains a unique system number embedded in that licence. This unique
number is unique over all installations. These unique numbers are stored as a reference in
networklane database table and provide the list of which machines are authorised to communicate.
PosGreen (fpos.dll) - Mesh Enabled - Technical Description
With a fully mesh enabled version of PosGreen, the licensing operation changes slightly to be
more dynamic and remove the need to contact central authorising systems. You can still continue
to use the non mesh licensing
With mesh licensing, the intention is to allow you to easily add lanes or replace computers, but
ensuring that computers are correctly assigned to live or test environments. Or to ensure that should
you accidently start a backup copy from two weeks ago, that we confirm your intentions first.
This model of licensing is more focused on authentication to use a database. It uses a series
of nested keys. At the top there is a Master key, which has the authority to generate new stores
and create sub master keys. A sub master key contains the ability to control a single store and install
new lanes in that store. A lane key is more restricted again in what it is allowed to authorise.
When installing a mesh enabled version of PosGreen, the following process is followed
- At startup, the system generates a "device id". This is a highly unique device fingerprinnt
that is semi static to this invidual machine. It may change slightly over time as hardware and
environment changes.
- The system scans and verifies any keys present against the device id. The checking allows
for minor variations in device id over time, but will break if large scale change is detected.
For example, copying the System to another PC should always break this licence check ie. are you cloning
to replace the computer (valid) or are you creating a copy for test/training purposes (invalid)
- The system displays to the operator that licensing is required. There are a few different
options to suit various situations and site security preferences
- The system scans for a licensing key. These are generally supplied by inserting a USB key
containing a store licence. The system reads the store licence and automatically installs
a licence for this machine. Licence keys are at least 2 million bytes long and cannot be entered
manually.
- If the system is connected to a network, it can also scan the network for a machine
prepared to provide a licence key automatically. The user is asked to confirm details
before network supplied licences are installed. ie. "Are you really part of Joes Supermaket, Central city, Production?"
- You can also directly copy the key files to the machine, or have the store master pre installed in the folder.
If a store master is present, at startup, it will be used automatically and then deleted
- Once a system is authorised, a unique id number is selected and inserted into Networklane.
This step is not required for operation, but allows reports to operate with modification.
The licencing keys that can be issued can contain additional controls to restrict their
use. The utility KeyManager.exe can be used to inspect and issue sub keys
Retailers using a Head Office server can configure distribution folders for lanes and stores. This allows
you to distibute different code and files to different lanes at your discretion.
The alternative to this is to use the quickcode f5001 to update POS code from Fieldpine servers. We recommend smaller sites
use Fieldpine and larger sites may wish to install their own distribution structure
How it works
- When a lane issues the command to update code ( PosCommand: maint(bis(code)) or Quickcode 78942 ) the lane connects
to the Head Office server.
- The head office server looks up a table of code distribution and finds which "distribution template" is to be used.
- The code in this folder is sent to the lane if required.
This means you can group lanes into different groups and have different versions of files at different sites. We suggest a "Live"
template and also a "Beta" template. The beta template is a smaller group of lanes where changes can be applied first and tested before
distribution to all lanes.
How to Configure a Lane
- On your Head Office server, start your HO version of POS. This will usually display a special head office version of POS controls,
but may not if your site IT have not built a specific version.
- If you do not have a button to select "code control", issue the manual command "plugin(storemgr.manage,)"
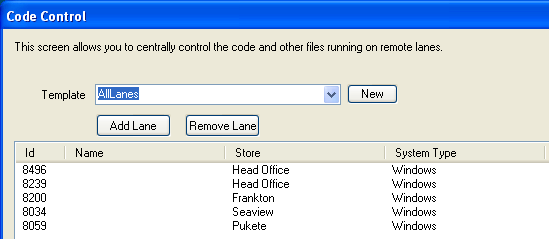
- A screen will open allowing you to control your stores and lanes. Select "code control" option.
- A sub screen will open showing the templates and lanes. Lanes can be allocated to one template. For a description of the templates
and where the folder holding the information is stored, please refer to your site private documentation. Use the various options on this screen
to adjust the lanes to the templates you want
How to Distribute an Update
-
Place the new file(s) into the template source folder. Each template has a folder holding its files. Consult your site documentation for the
Windows folder path. We suggest these folders are a subfolder of the POS folder, named after the template name. eg "Beta" template
would be ...pos folder..\Beta\*.*
- If the folder contains the file "bisupd.zip", delete this file. This zip file is what is actually sent to the lanes, and the system
will dynamically build it if not present. You do not need to create this zip file yourself. We require you to remove the bisupd.zip file as
this acts as a trigger/gateway allowing you to safely update the folder while lanes are actively using it.
- The distribution folder should contain all files for a lane, not just recently changed files.